The type of backing used on your custom patch will determine how long your patch lasts. While most people spend quite a lot of time choosing and designing their patches, including the thread colours and patch shape, many people just choose a patch backing quickly without really thinking about it.
This can cause issues with quality patches. When creating patches for your tradie team, school house, sports club or café branding it’s important to know what type of patch will work best.
This guide from Patch Makers NZ takes you through the options available, including iron on, sew on, velcro and peel and stick. We also give you an honest breakdown of the pros and cons of each option.
If you’re ordering your custom patches for your NZ teams and brands you’ll know exactly what backing you want on your patches.
What Is Custom Patch Backing and Why Does It Matter?
The backing of a patch is what goes on the reverse side of your patches to help them attach to your garments or bags.
Choosing the correct custom patch backing will help to ensure your patch is durable but also easily removable/replaceable and comfortable to wear. It will also ensure it survives the wash!
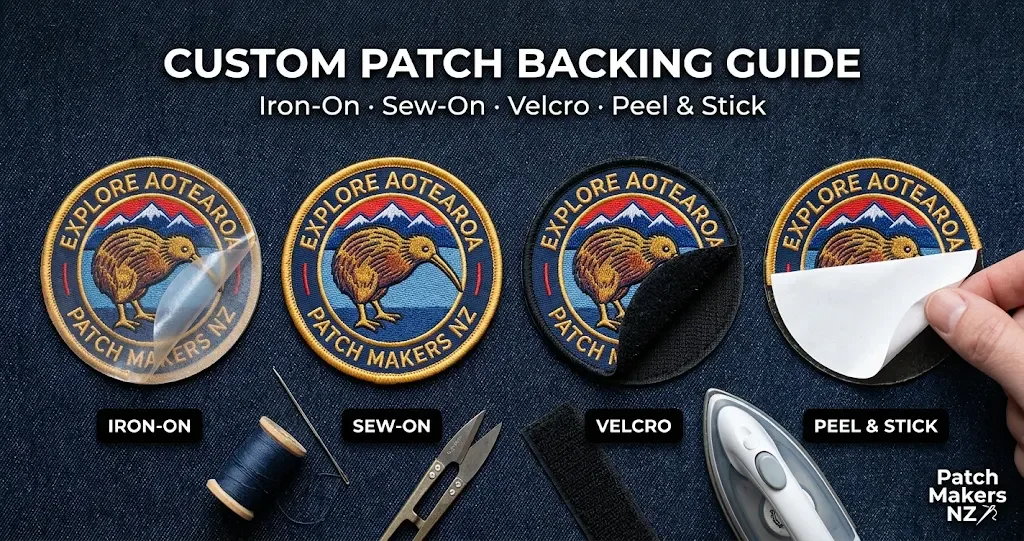
Patch Makers NZ offer 4 different patch backings for every order. Iron on (Heat Seal), Sew on, Hook and loop or peel and stick. But before choosing which one to go with ask yourself these questions;
- What is it being applied to? Will it be going onto cotton workwear, Nylon Jackets, Caps or Backpacks?
- How long do you need it to last? Seasonal, Years or just for one event?
- Will it ever need to be removed? Rotating names, roles or certifications?
Once you have answers to these questions it usually becomes an easy choice. Below we have covered each type.
Iron-On Patches: Heat Seal Patch Backing Explained
This patch has a thin layer of heat sensitive glue on the back. When exposed to a high temperature and pressure it will melt into the weave of the fabric and bond.
This is also known as a heat seal patch. It is the quickest method to apply a patch.
Pros:
- Quick and easy to apply. No sewing required.
- Looks clean.
- Suitable for cotton/cotton blends, denim and canvas.
Cons:
- Not as strong on stretchy, waterproof or heat sensitive fabrics such as nylon.
- Edges can come out from repeated hot washes if the patch wasn’t properly sealed.
Best used on team shirts, hats, tote bags and short runs. We recommend adding a couple of stitches around the edge of your patches if you are applying them to jackets/bags that will be used heavily.
Sew-On Patches: The Most Durable Option
This is the traditional method. The patches have a plain fabric on the back which can be sewn onto the garment using either a sewing machine or needle. We recommend using these if your patch will be going through rigorous conditions.
Pros:
- Most secure. Can withstand a lot of washing including industrial.
- Can be used on thick stretchy or delicate fabrics without the risk of overheating.
- Easy to change by simply undoing the stitches.
Cons:
- More time consuming, especially for large teams.
- Stitching will be visible if you don’t match your thread to the edge.
Best for custom uniform patches NZ work wear, jackets and bags. Ensure you match your thread and fully stitch around the edge of your patch. If you don’t feel like sewing up a whole team’s worth we recommend taking it to a local alterations shop who can do it quickly.
Velcro Patch Backing: Hook and Loop for Easy Swaps
Velcro is a trademarked product but the common name is ‘hook and loop’. This involves attaching the rough ‘hook’ side of the patch to the garment.
A soft ‘loop’ section will need to be sewn onto the garment. With our hook and loop patch backing you can order both sides so your patch is ready to go as soon as your loop is sewn onto your garment.
Pros:
- Easy to remove and re-use. Can quickly change your names/roles/badges.
- No damage to the garment as it won’t require much stitching or heating.
- Great for patches that will be used on multiple jackets/vests.
Cons:
- The loop section will need to be sewn onto your garment.
- Slightly bulkier and the hook side can catch on knits.
- The grip may weaken over time due to lint.
Best used on tactical/workwear, hi-vis vests, sports bibs and anything that needs to be changed regularly.
Peel and Stick Patch Backing: Simple and Temporary
This backing has an adhesive layer covered in a paper backing. Simply peel off and stick your patch onto your garment. No iron, needles or tools required.
This is great for events, freebies, one day uniforms or if you are testing out a new design. The downside of using an adhesive is they aren’t designed to withstand lots of washing.
They will also only really grip onto clean, smooth and dry surfaces. Consider this a temporary solution and use a different backing if you need your patch to stay on during the washing.
Iron-On vs Sew-On Patches: Which Should You Choose?
Iron-on vs sew-on patches is the question we hear most. The short answer: iron-on for speed, sew-on for longevity, hook and loop for flexibility, and peel and stick for short-term use.
| Backing | Application | Durability | Removable? | Best for |
| Iron-on (heat seal) | Iron or heat press | Good | Difficult | Cotton tees, caps, merch |
| Sew-on | Needle or machine | Excellent | With unpicking | Workwear, jackets, bags |
| Hook and loop | Sew on loop panel | Very good | Yes, easily | Tactical gear, vests, name tags |
| Peel and stick | Press on by hand | Low | Yes | Events, giveaways, trials |
Can’t decide? Plenty of people combine methods, pressing an iron-on patch into place and then stitching the edge for a bond that lasts.
Best Backing by Use: Workwear, Denim, Tactical Gear and Caps
The best custom patch backing depends on where the patch will live. Here’s how we’d match backing to the job.
- Workwear and uniforms: The best backing for workwear uniforms is sew-on, especially when garments go through frequent hot or industrial washes. If names and roles change often, hook and loop is the smarter pick.
- Denim jackets: The best patch backing for denim jackets is sew-on for a lifetime hold. Denim is sturdy cotton, so iron-on also bonds well, and a few stitches around the edge make it last.
- Tactical and morale gear: Tactical patch backing is almost always hook and loop, because it lets wearers swap patches between kits. Morale patches NZ buyers love the same flexibility. Velcro patch backing keeps a pack or vest fresh as the mission or the mood changes.
- Caps and hats: Sew-on is usually the safest choice. Heat bonding can work on flat panels, but curved crowns make it tricky to get an even press.
- Bags and backpacks: Sew-on or a hook and loop panel, so the patch survives being dragged around.
- Merch and events: Iron-on for takeaway merch, or peel and stick when it only needs to last a day.
How to Attach Custom Patches: Step by Step
Knowing how to attach custom patches properly matters as much as picking the right custom patch backing. Always check any instructions that come with your order, since heat settings vary by fabric.
Iron-on patches
- Wash and dry the garment first, with no fabric softener, then iron out any creases.
- Set the iron to the cotton setting with steam off.
- Position the patch, cover it with a thin cotton cloth and press down firmly for about 30 seconds.
- Flip the garment and press the inside for another 20 to 30 seconds.
- Let it cool completely before testing the edges.
Sew-on patches
- Pin or tack the patch in place.
- Stitch around the border with a whip stitch or small backstitch, matching your thread to the patch.
- Knot off on the inside of the garment.
Hook and loop patches
- Sew the loop panel onto the garment, stitching all four edges.
- Press the hook-backed patch onto the panel.
Peel and stick patches
- Clean and dry the surface.
- Peel the liner, place the patch and press firmly for 30 seconds.
Five Common Backing Mistakes to Avoid
We see the same slip-ups again and again. A little planning avoids all of them.
- Choosing iron-on for stretchy or waterproof fabric. Heat can damage these materials, and the bond rarely holds. Sew on, or use a loop panel, instead.
- Skipping the pre-wash. New garments can carry finishes that block the adhesive, so wash and dry them before you apply anything.
- Rushing the cool-down. Moving or peeling a freshly pressed patch breaks the bond before it has set.
- Using peel and stick where washing is involved. Self-adhesive is for short-term use. If the garment goes in the machine, pick another option.
- Forgetting the loop panel. Hook-backed patches need a sewn-in loop side. Order both sides together so nothing is missing on installation day.
Matching Backing to Your Patch Type
The patch material matters too. Choosing a custom patch backing that suits how the patch is made saves headaches later. Here’s how the three most popular patch types pair with each backing.
Custom Embroidered Patches
The best backing for embroidered patches is sew-on or iron-on. Our custom embroidered patches have raised stitching that adds thickness, so on heavy-use items such as work jackets and bags, iron-on plus edge stitching is a solid combination.
Custom PVC Patches
PVC is rubbery and waterproof, and direct heat can distort it. For Custom PVC patches, hook and loop is the usual choice, and it suits tactical and outdoor gear that sees rain, mud and rough use.
Custom Woven Patches
Custom woven patches are thin and finely detailed, so iron-on or sew-on gives a tidy, low-profile finish. They suit small text, fine logo lines and lightweight garments such as uniform shirts.
Not sure which backing suits your garment?
Tell us what you’re attaching the patch to and we’ll recommend the right option. Every order of custom patches NZ businesses and clubs place with us starts with a free digital proof, with a low minimum of 10 patches per design.
Frequently Asked Questions
Do iron-on patches stay on after washing?
Yes! As long as they are properly applied to suitable material, they can be washed on reverse in cold/warm cycles and line dried for longer durability. You can also sew round the edge for heavy use items.
Can you sew an iron-on patch?
Yes! They are very thin so you can easily sew through them. Sewing round the edge will give extra security.
What is the best patch backing for beginners?
Iron on is the easiest to use at home. If you want to avoid sewing the actual patch itself then choose hook and loop patch backs. These just need sewing onto the loop part.
What are the best patch backs for temporary use?
Hook and loop and peel and stick. Hook and loop are reusable and durable. Peel and stick are great for temporary use.
How many minimums do you have?
We have low minimums for custom patches across New Zealand. Starting at just 10 per design. Most patches will be shipped within a week of proof approval. This may vary depending on the style and amount ordered.
Get the Right Backing on Your Next Order
Use the correct patch backing to ensure your patches look crisp. Choose from iron on vs sew on, hook and loop or peel and stick.
The correct backing will depend on the type of fabric you are using, amount of work and if it needs to be frequently changed.
Our reliable team of custom patch makers is the choice for many New Zealand businesses, schools and clubs. From your design to a free digital proof, manufacturing and free delivery we have you covered.